Magnetic Nozzle (magneticNozzle.pre)
Keywords:
-
Magnetic nozzle, Gas dynamic MHD
Problem description
This example simulates the plasma acceleration in a magnetic nozzle used in micro vacuum arc thrusters to improve the performance. The magnetic field lines are generated using current coils placed around a cylinder. The magnetic field lines form a virtual nozzle for incoming plasma. Incoming plasma is generated from the arc discharge. The simulation is demonstrated using two dimensional domain though axi-symmetric is preferred. External magnetic field is generated using wire field equation. The flow is simulated using gasDynamicMhd equations(refer to USim reference manual). Arc is not simulated, instead constant number density, velocity, ionization number, and electron ion temperature ratio at the erosion surface are given as inputs.
This simulation can be performed with a USimHEDP license.
Creating the run space
The Magnetic Nozzle example is accessed from within USimComposer by the following actions:
- Select the New from Template menu item in the File menu.
- In the resulting New from Template dialog, expand USimHEDP: High Energy Density Plasmas.
- Select Magnetic Nozzle and press the Choose button.
- In the Choose a name for the new runspace dialog, press the Save button to create a copy of this example in your run area.
- Press the Save And Process Setup button in the upper right corner of the Editor pane.
The basic example variables are editable in the Editor pane of the Setup window. After any change is made, the Save and Process Setup button must be pressed again before a new run commences.
Input file features
The following parameters can be varied to study different plasmas:
- GRIDFILE - grid file name
- CFL - CFL condition for the simulation
- ATOMIC_WEIGHT - Atomic weight of ions
- ION_GAMMA - Specific heat ratio ions
- ELECTRON_GAMMA - Specific heat ratio of electrons
- N0 - Initial number density of ions
- ION_TEMP - Temperature of Ions at the nozzle inlet
- TEMPERATURE_RATIO - Temperature ratio of electrons and ions at the nozzle inlet
- Z_RATIO - Average change number of ions
- COIL_DIAMETER_RATIO - Ratio of the diamter of current coil to the diamter of the thurster cylinder
- COIL_CURRENT - Coil current to generate magnetic field
- V_IN - Inlet velocity of the plasma x-component
- U_IN - Inlet velocity of the plasma y-component
- INLET_NUMBER_DENSITY - Number density of ions at the nozzle inlet
- RESISTIVITY - Resistivity of plasma
- TSTART - Simulation start time (seconds).
- TEND - Simulation end time (seconds).
- NUMDUMPS - Number of data dumps during the simulation
Running the simulation
After performing the above actions, continue as follows:
- Proceed to the Run window as instructed by pressing the Run icon in the workflow panel.
- To run the simulation, click on the Run button in the upper right corner of the Logs and Output Files pane.
You will also see the engine log output in the Logs and Output Files pane. The run has completed when you see the output, “Engine completed successfully.”
Visualizing the results
After performing the above actions, continue as follows:
- Proceed to the Visualize window as instructed by pressing the Visualize icon in the workflow panel.
- Press the Open button to begin visualizing.
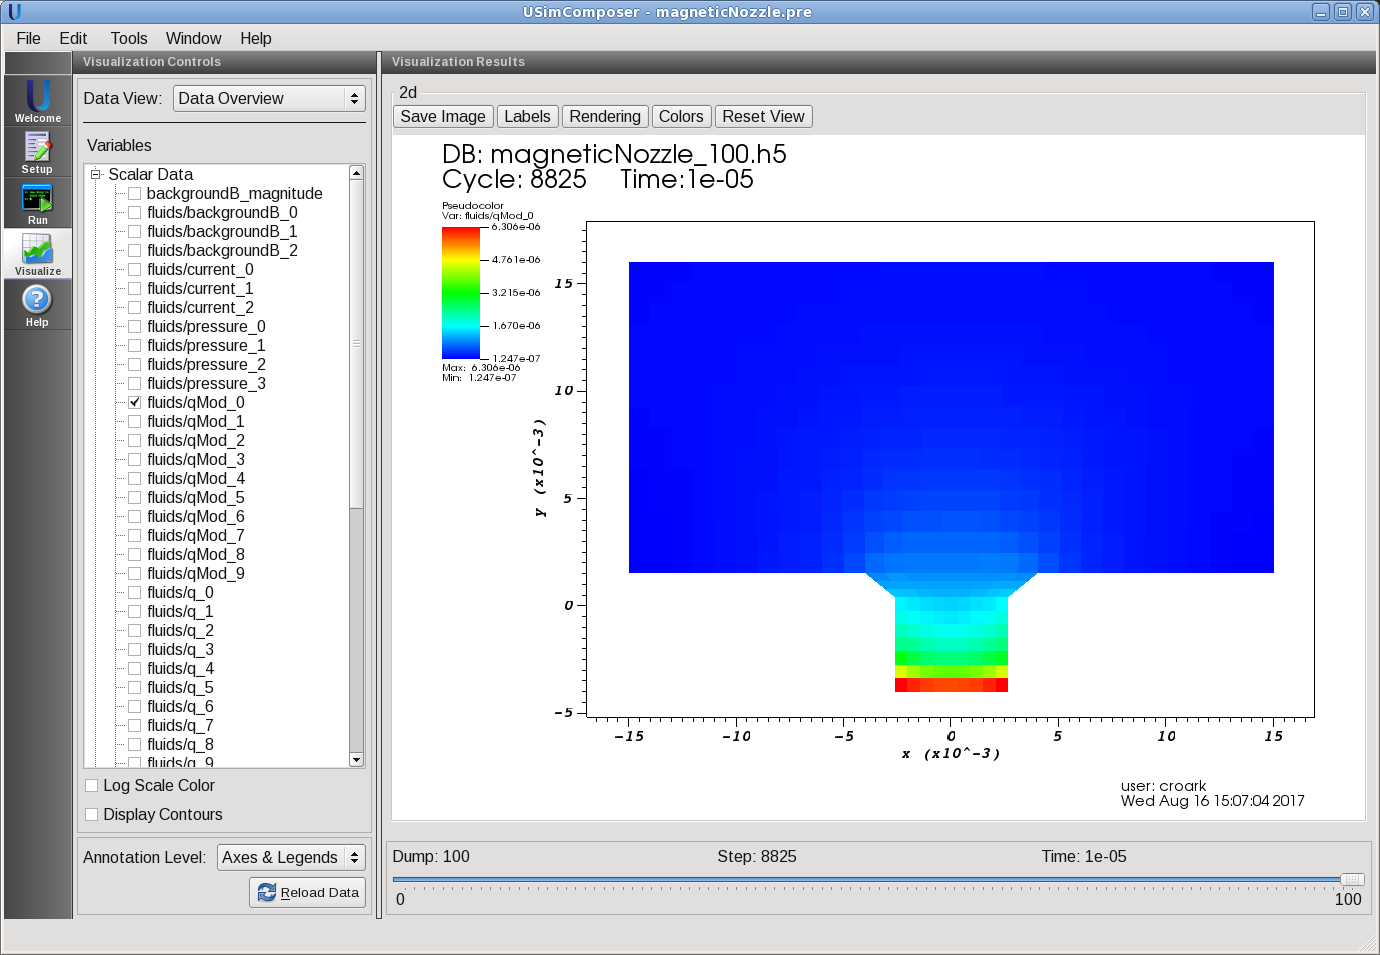
- Expand Scalar Data and click the check box for fluids/qMod_0 to visualize the ion density.
- Drag the slider at the bottom of the Visualization Results pane to move through the simulation in time. The fluid density distribution at the end of the simulation is shown in Fig. 88.
Similarly other parameters such as magnetic field can be visualized. The description of output parameters follows
- E_0,E_1,E_2 electric field
- J_0,J_1,J_2 total current
- Z ionization number
- backgroundB_0,backgroundB_1,backgroundB_2 magnetic field induced by wire
- eta resistivity
- nDens_0 number density of ions
- nDens_1 number density of electrons
- qMod_0 mass density of ions
- qMod_1,qMod_2,qMod_3 momentum components
- qMod_4 ion energy density
- qMod_5,qMod_6,qMod_7 magnetic field components
- qMod_9 electron energy density
Further experiments
- Type of plasma can easily be changed by choosing the appropriate ATOMIC_WEIGHT.
- The effect of variation in arc current can be simulated by changing`INLET_NUMBER_DENSITY` and/or V_IN. For example, increase the INLET_NUMBER_DENSITY and V_IN by 100%.
- The plasma jet focus can be adjusted by varying the COIL_DIAMETER_RATIO and COIL_CURRENT. Note that in this demo, the coil is actually a wire and coil diameter is distance between the wires. For instance, increase the COIL_DIAMETER_RATIO and/or COIL_CURRENT up to 100%.
- Try running in parallel on 2 cores by changing the grid to magneticNozzle2.msh
