VSim Installation Instructions
These are instructions on installing the VSim product. Please see the VSim System Requirements first to make sure your system meets the requirements.
Windows VSim Software Installation
The VSim distribution package for 64bit Windows is a self-extracting executable installer. Invoke the installer by double clicking on it. The default installation path is:
C:\Program Files\Tech-X (Win64)\VSim-11.0
where X is the minor version of your software. To open the VSim software, go to the Start Menu, click on the Tech-X folder, click on VSim 11.0, then click on VSimComposer. See Fig. 1.
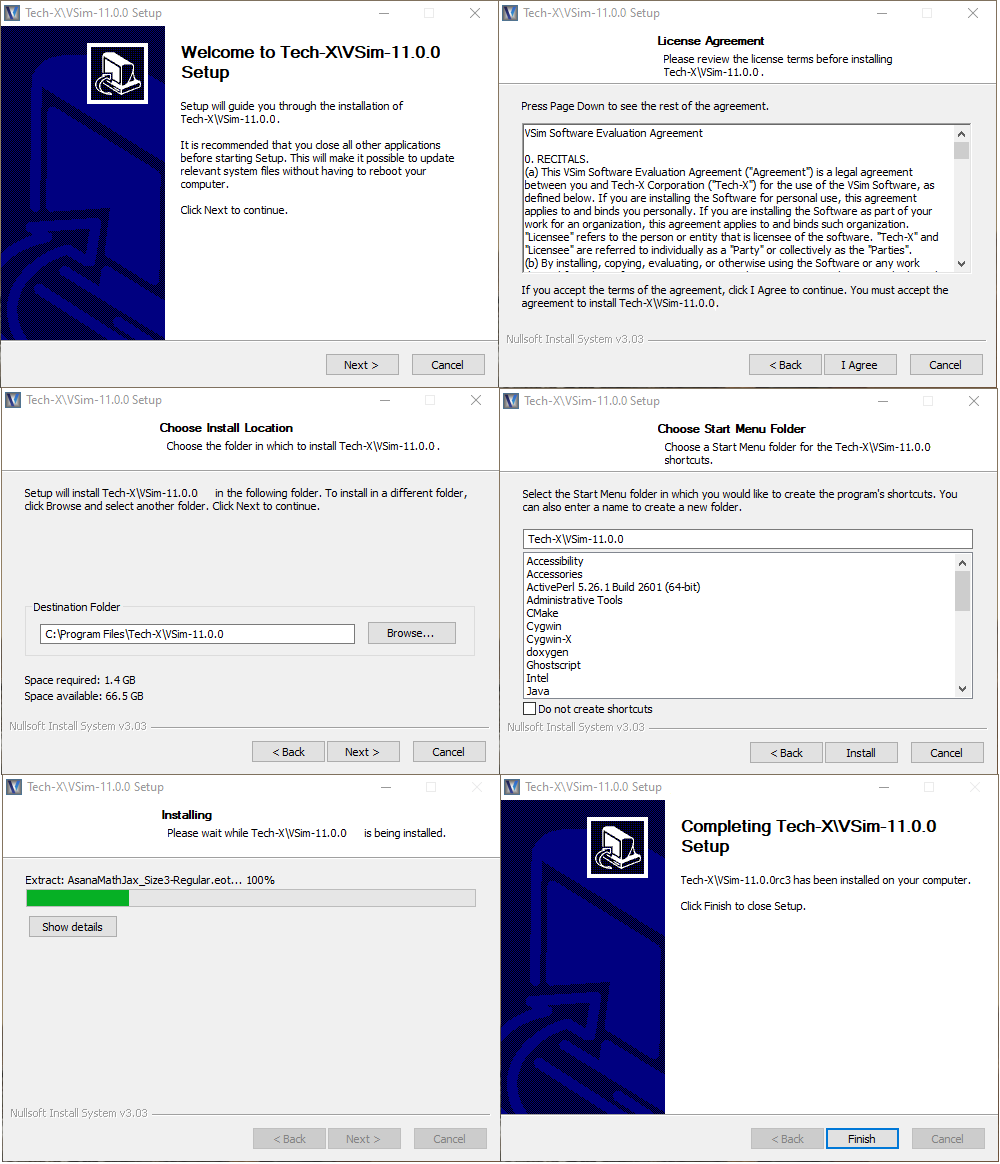
Fig. 1 Dialogs for Windows installation
Windows Cluster VSim Software Installation
There are a few extra steps when installing on a Windows Cluster and we detail them here. VSim will work on a Windows cluster that uses Microsoft HPC Pack (Version 2012 R2 or later is required).
First, install VSim on the cluster headnode using the instructions above in the Network Share Section. The cluster license file will need to be copied into the correct location as described above and it will need to refer to the correct shared directory – normally a good choice for this directory would be a subdirectory of the UNC Shared Path alongside the VSim installation.
For operation on a Windows Cluster it is crucial to use the MPI that comes with Microsft HPC Pack. So, we must set aside the MPI that is distributed with VSim. Using the exmaple from the Network Share Section above, one would open a Command Prompt and execute the following commands:
S:\>cd VSim\Contents\engine\bin

S:\VSim\Contents\engine\bin>move mpiexec.exe mpiexecOFF.exe
      1 file(s) moved.

S:\VSim\Contents\engine\bin>move msmpi.dll msmpiOFF.dll
      1 file(s) moved.
This will ensure that the mpiexec.exe in the PATH variable will be the one on the system. This can be verified by the following:
S:\VSim\Contents\engine\bin>where mpiexec.exe
C:\Program Files\Microsoft MPI\Bin\mpiexec.exe
This completes the installation and now it can be tested using the Running Vorpal on a Windows HPC Cluster section of the VSim User Guide.
Now (also following the exmaple in the Network Share Section above), Jack can use VSimComposer to
create a simulation directory (say mysim) in the shared folder,
for example:
S:\jack\simulations\mysim
This directory and, therefore, the simulation input will then be available to all the nodes on the cluster when a job is submitted.
Linux VSim Software Installation
The VSim distribution package for Linux is a gzipped tarball. Unpack the gzipped tarball into the directory in which you wish to install VSim. A typical location would be
/usr/local/VSim-11.0
The unzip and untar command is
$ cd /usr/local
$ tar xf VSim-11.0.0-Linux64.tar.gz
Or, if your Linux machine does not have OpenGL rendering support then you may want to install the “offscreen” version, in which case the file would be “VSim-11.0.0-Linux64-offscreen.tar.gz. After untarring, the user interface is started with the command:
$ cd VSim-11.0
$ ./VSimComposer.sh
If you plan to run the simulation engine or any other executable from the command-line then you will need to source the startup script:
$ source /usr/local/VSim-11.0/VSimComposer.sh
<execute engine, analyzers, etc.>
See VSim User Guide: Running Vorpal from the Command Line for more instructions on command-line operations.
Making your data web accessible
If your simulation files are stored on a workstation with a web server, you can make your files web accessible, as discussed here.
- Requirements
- Working OpenLdap directory server
- Must have ssl support on port 636
- Available credentials to connect to openldap server. Anonymous binds not supported
- User accounts in the LDAP directory must have the homeDirectory attribute set
Procedure:
Install Apache Httpd web server, php and the php ldap library
$ dnf install httpd mod_ssl php php-ldap $ systemctl start httpd $ systemctl enable httpd
- Edit index.php and set appropriate values for the following variables
$ldap_server_uri = ‘ldaps://ldapserver.example.com’; $search_scope = ‘ou=users,dc=example,dc=com’; $proxy_dn = ‘ldapserver_bind_dn’; $proxy_pass = ‘ldapserver_bind_password’;
Copy index.php, display.php, and logout.php into the Apache Httpd web server’s DocumentRoot directory. On Redhat based machines e.g Fedora, Centos, the default DocumentRoot is /var/www/html
Go to https://localhost , log in and verify that you are able to see your files.
Mac OS X VSim Software Installation
Unpacking the DMG file:
The VSim distribution package for Mac OS X is a .dmg installer. Invoke the installer by double clicking on it. Drag the VSim-11.0 folder into your Applications folder (visible in the installer window). From the Application folder, double click on the VSimComposer icon in the VSim-11.0 folder. See Fig. 2. This default installation path is:
/Applications/VSim-11.0
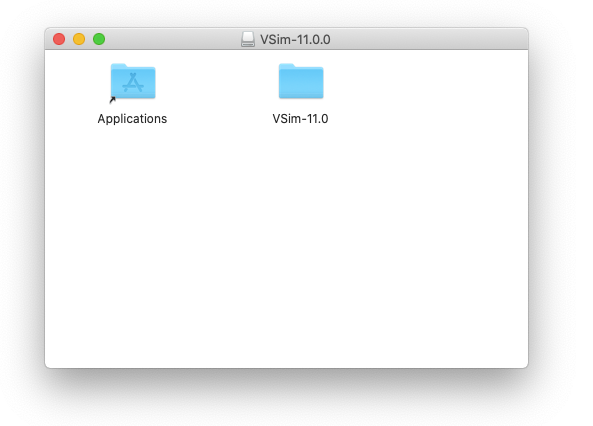
Fig. 2 Dialog for the Mac installer
Workaround for signing issues:
As of El Capitan, Apple instituted GateKeeper, which by default prevents one from executing an unsigned application. The symptom can range from inability to install a license to being told the application is damaged as shown in Fig. 3.
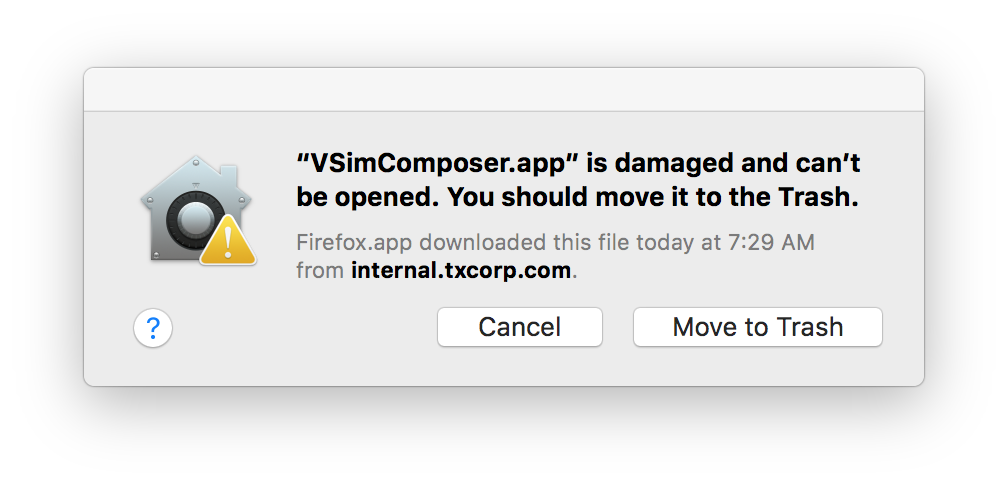
Fig. 3 Warning that VSimComposer is damaged, put up by GateKeeper when code signing is not properly recognized.
If you are experiencing this, then close VSimComposer and open an XTerm and run the commands:
$ cd /Applications    # or wherever one has installed VSim-11
$ xattr -rd com.apple.quarantine VSim-11.0
Then reopen VSimComposer – the message should be gone.