Materials
The Materials element stores information about any materials used in the simulation. Once a material has been added to the simulation it is possible to assign it to a geometry of the simulation.
In RSim3.0 pre-defined materials are available, isotopes can be created, and complex materials can be made from any combination of the pre-defined materials, isotopes and complex materials.
When the simulation is saved a file simulationName_materials.xml will be created and automatically included in the simulationNameAllShapes.gdml file, where simulationName is the name of the simulation file.
Note that material names can not have spaces in them.
Pre-Defined Materials
To use one of RSim’s pre-defined materials, highlight the Materials element and then switch from 3D View to Materials in the Geometry View (see RSim User Guide: Setup Window for Visual-setup Simulations for a picture of the Geometry View). To add one of the pre-defined materials from the table, highlight the material then press Add To Simulation button in upper right hand corner of the RSim Composer window. The material will now be listed under the Materials element.
These materials consist of all built in materials of RSim, there are approximately 700. Each material will show the elements used to create it and fractions of those elements. Each element is comprised of the natural abundances of that elements isotopes.
The properties of the materials are:
- density (not editable)
- The density of the material
- Material X (not editable)
- The element comprising part of the material. There will be as many X materials as used by the pre-defined material.
- Fraction X (not editable)
- The mass fraction of the pre-defined material that is comprisied of the element. There will be as many Fraction X as used by the pre-defined material.
- color
- The color that can be assigned to geometries of this material. See Color Assignment By Material
Isotopes
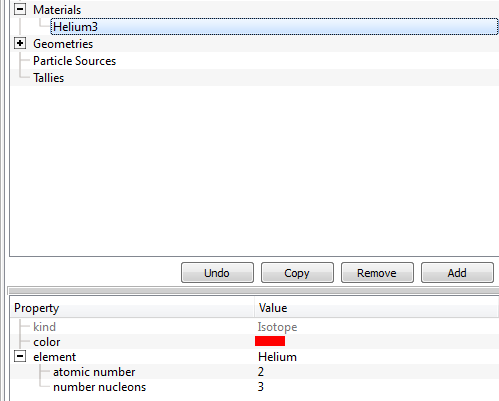
To create an Isotope right click on Materials and select Add Isotope. The isotope may be given any name, and assigned a color. An element may then be selected, with the properties:
- atomic number (not editable)
- The atomic number of the element
- number nucleons
- The number of nucleons of the isotope, available as a list of those that can be created
This isotope will then be created in the simulationName_materials.xml file directly.
Complex Materials by Fractional Mass
A complex material is created by right clicking on Materials, mousing over Add ComplexMaterial and selecting Complex Material by Fractional Mass.
The complex material may then be given any name, and can be assigned a density as well as a color. Constituent Materials are added by right clicking on the complex material and selecting Add Constituent Material. Any number of constituent materials may be used in a complex material. The Constituent Material can then be named and has the properties:
- fraction
- The mass fraction of the complex material this constituent material makes up. The sum of all fractions must add up to within 3% of 1.0
- material name
- A drop down list of all the other Pre-Defined Materials, Isotopes and Complex Materials in the Materials tree.
Note
In RSim3.0 if a Complex Material is used as a Constituent Material for another Complex Material, the first Complex Material must be defined above it’s use as a Constituent Material in the tree.
Complex Materials by Atomic Ratio
A complex material can also be defined by the atomic ratio of it’s constituents, by right clicking on Materials, mousing over Add ComplexMaterial and selecting Complex Material by Atomic Ratio
The complex material can then be given any name, and must be assigned a density and color.
A Constituent Material is added by right clicking on the complex material and selecting Add Constituent Material. For Complex Materials defined by Atomic Ratio it is not necessary to pre-define the material that wil be used as a constituent material.
Any number of constituent materials may be used in a complex material. The Constituent Material can then be named and has the properties:
- stochiometric coefficient
- The stochiometric coefficient of the resulting material. (e.g. the 2 of H20)
- element
A drop down list of all the elements.
- atomic number
- Atomic number of the element.
- number nucleons
- Number of nucleons of the element.
Material Annotation from .CSV File
Materials can be assigned to all objects currently in the simulation with a .csv file. This is most commonly used when importing complex CAD objects with multiple parts.
The .csv file is a 2 column file organized in order of Part Name, Material Name, as shown below.
gold_case_simple, Aluminum
gold_det_housing_simple, Silicon
gold_det_tantalum_simple, Tantalum
The Part Name must directly match the part in the cad file, without the assembly name attached in any way. The material properties assigned will correspond to those of the default RSim G4.vmat library.
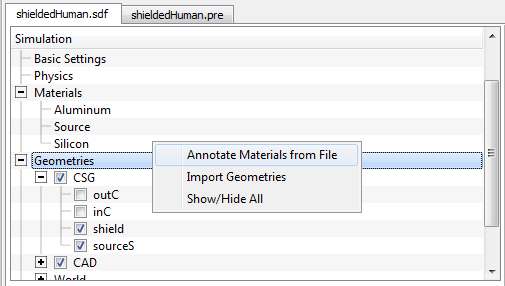
To perform material annotation right click on the Geometries tab, as shown below
This will open a dialog box to navigate to, and select the .csv files to annotate materials. After annotation has been performed, all parts will have the material given in the .csv file, and the geometries in question will now be able to be assigned to tallies.
The materials added to the simulation by annotation will NOT be visible in the Materials tree, but will be those present in the G4.vmat library.
Material Annotation with Custom Materials
RSim does support the use of a custom materials list provided it is in .xml format and GDML compliant. The custom materials list must have the same name as the simulation, as shown in the Shielded Human example with shieldedHuman_materials.xml.
Custom materials can only be assigned to geometries through the Materials Annotation process. As such they will not be imported into the Materials tab and cannot be reassigned from within RSim.
It is necessary for the material names in the custom materials list to be unique from those included in the G4.vmat library.
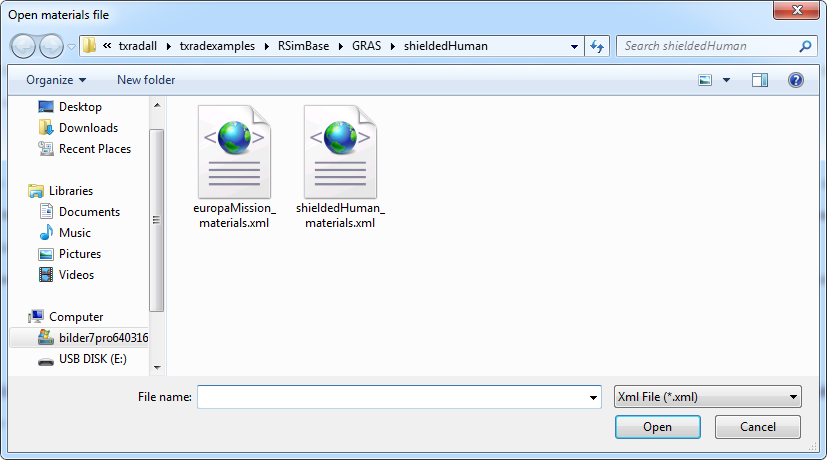
To annotate with custom materials simply perform Material Annotation from .csv File. When this happens a dialog box will appear when it finds a material name that is not present in the library, as shown below.
This dialog box will direct you to select a .xml file, and materials annotation will then be completed from that .xml file. This same file will then be imported in the simulation .gdml file, carrying the materials information into the simulation. This does require that the .xml file be in the same local directory as the simulation.
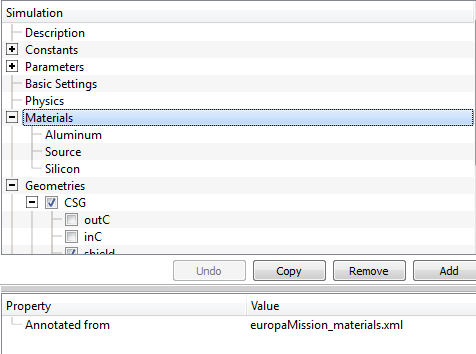
Under the Materials Tab, the property Annotated From will have the .xml file given as a value.


